Building Technique for Allied Sherman Type 3 piece Individual Track Links
Mission Statement:
This article is aimed at beginners to individual track links like me and my explanations may seem fairly basic at times, but I'm trying to explain what I've learned in simple and easy to understand directions to help others around the world. And who knows maybe some of you more advanced builders out there will pick up a tip or two.
Note: Article Originally published on Armorama.com on 05/28/2003 
Recently I've been working on a Sherman Firefly Vc by DML. This kit comes with individual track links that have been driving me batty. After several false starts trying a couple of different techniques, I finally hit upon a way to build them that was fairly easy for me.
This method should work on most 3 piece track link styles, such as those found on Sherman's, Grants, Lee's, and many other Allied AFV's. These track links have a single piece for the tread and two connectors for either side to hold the links together, such as the diagram to the right.
Part 1 the beginning:
Materials Needed.
- A pair of self-locking tweezers
- A few Popsicle sticks
- A pair of pliers
- Superglue or your favorite modeling glue
- A glue applicator
The first step is to remove the parts from the spruces and clean them up. I keep my parts in small containers that have lids, such as film containers. I'm not going into detail on this part of the job as its really not what I'm writing about, so from here on I'll assume you have your parts ready for assembly.
A few notes: I use 5 to 15 second gap filling super glue for this project because it is thick enough to stay where I put it and gives me enough time to work with it before it dries, yet still dries fairly fast so I can keep working away at the tracks. Also since I'm using a glue applicator to place the glue on the parts, I keep a bit of cloth on the table to wipe the tool off after every application of super glue, otherwise the dried glue will start to build up on it.
Part 2 preparing the tweezers:
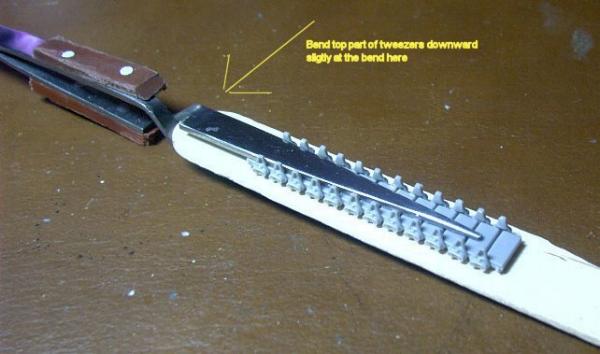
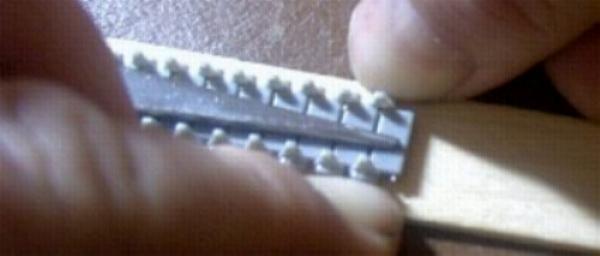
The first thing you have to do is modify a pair of self-locking tweezers so that they work like a jig. I used a fairly cheap pair because this process requires them to be bent. You take your pliers and bend the tweezers slightly downward at the bend where they cross. If you do not bend them then as your building the run of links the end of the tweezers start to open wider and the last link you are working on isn't held in place, instead the tweezers will actually be holding them further back from your work while the end is in the air holding nothing. But if you bend them a bit, not to much though, then the tweezers will lay flat along the run of track holding each and every piece in place, esp. the last piece.
The following picture shows what is needed.
Part 3 The assembly:
Here are a couple of things to think about before assembly. One do you want to make your track where it is flexible so that you can build the entire assembly and then string it onto the tank, or do you want to make it inflexible so that it is stronger and more durable.
I personally have chosen the flexible route, using this method I only apply glue to one side of the connectors, letting the pieces hold the next tread piece in place without glue. This method allows you to build the entire track and then place it on the tank, making fitting around the drive sprocket and other parts of the running gear easier. The only downside I've seen with this method is the track is slightly weaker and you have to be careful flexing it, or you can break the pins. Then you will have to glue that section down solid.
The inflexible route requires more planning, and requires you to glue your pieces in straight sections that cannot be moved once the glue dries and requiring careful fitting in order to get the fit correct around the running gear. For this method I wouldn't recommend superglue as it dries to fast.
Step 1 is to take out 1 tread piece and 2 connectors from your storage containers. If this is the start of your run, you will need 2 tread pieces.
Step 2 is to test fit the pieces you have just removed. I test fit every hole in the connectors with every pin on the next tread piece I'm going to use. You never know when a hole isn't going to be deep enough and needs to be drilled out, or a pin has too much flash on it, and after you've applied the glue is a bad time to find out these little surprises.
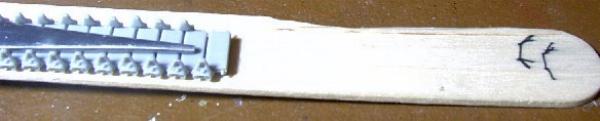
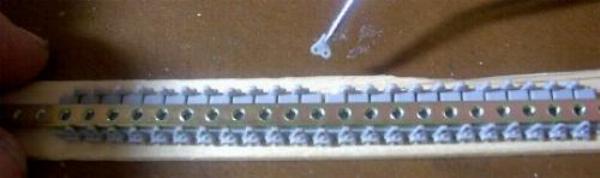
Step 3 if this is the start of your run place the first tread piece on the popsicle stick holding it in place with the modified tweezers.
A helpful note here is if your tread piece has any surface features or details and they all must be turned the same way, it to draw the direction the detail must be turned onto the end of the stick. This way you don't get confused. The drawing on the right of the stick tells me which way the tread detail runs.

Step 4 is applying the glue to the connector. I use a popsicle stick with a piece of tape on it to hold the connector in place. These pieces are very small and I hate looking around on the floor for them. I place a small bit of super glue on my applicator.
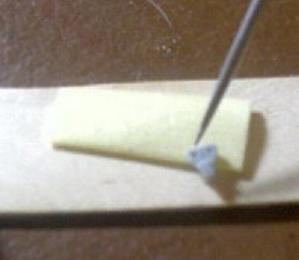
For the applicator I use a tool I found in the leather working section of a craft store. It is made for poking holes in leather but its sharp point is great for applying small bits of superglue, and best of all it cost less than $2.00.
Always glue the parts the same way each time so that the tracks will look consistent. I always glue from left to right because that seems simplest. This means you glue your connectors to the last tread piece in your track run allowing the next piece to swing freely.
Step 5 is to place the connector onto the previously placed tread piece and wait for the glue to dry enough to continue.

Step 6 is to place the next tread piece into the connector you just glued, remember since I'm building a flexible track, I don't use any glue to hold this tread piece into place. I allow the pins only to hold it so that it moves fairly freely.
Step 7 is to apply glue to the next connector piece (again only in 1 of the holes) and put into place and allow to dry.

One thing to remember is to use caution when you are pressing the connectors onto the treads. You will always need to keep the pressure on both sides of the track the same otherwise you may at best wind up with a crooked track or at worst break previously glued links.
Step 8 is to repeat until the track run is finished. I build in runs of 10 to 14 tread pieces since this is what my tweezers will hold down nicely. Then when I have several runs built I glue them together using connectors. Since they get to long for my tweezers to hold down I use a straight edge to keep the runs flat while gluing them together.
Part 5 my Rant on Individual track links:
Since starting the track links on this project, I have at times been ready to give up and go find some rubber band type tracks, and go "the easy route", but in the end after many hours of frustration, I finally found a way that "clicked" and now doing these tracks for me has become easy and enjoyable. Although I will admit that I find cleaning up the pieces tedious and boring.
In the end I really like how they look on the model and I hope that some may profit from this article and not have to go through as many problems as I did to find this method.
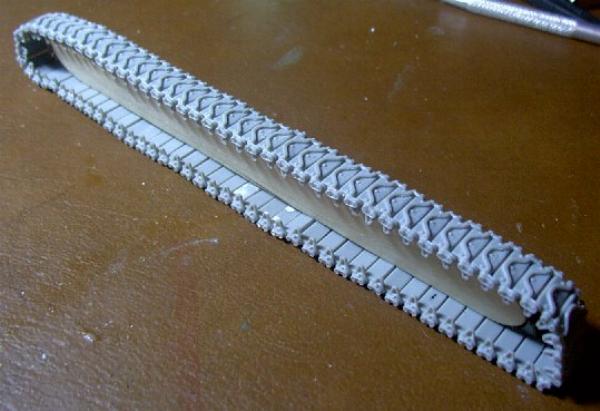
I will end now by showing one of my completed tracks minus the paint of course and invite all out there to discuss this technique and add any helpful ideas that they use for this style of track.
I hope this Guide has been a help. This was written some time ago and the photos were taken with a 2mp camera..